Showing posts with label sewing. Show all posts

Wednesday, April 10, 2013

Tutorial: Round Pincushion - pt 06

To make the top, I had to cut another circle, but with like 2cm more than the one I had for the bottom.


Sew it around a bit to make it like a bowl, then put some acrylic blanket.


Top it at the box, and then fix it with pins before start to sew.


Momoji isn't cute at the back? LOL.

Sew the border, but let like 2 or 3cm without sewing and make a knot. This will allow you to fill the pincushion until you feel like it's ok, without having to worry to have it loose.


After filling, just finish sewing and you're done!


Now it's just decorate the way you want. I didn't anything, as I'm using it to keep the pieces of other works. I cut or sew them and to don't loose them I fix with a pin while I'm doing other things.


LOL. My green pincushion is now a companion to my chocolate cake and my strawberry tart... XD

I swear that the day I kick out my lazyness again I'll edit with all the links to the previous parts...


Tutorial: Round Pincushion - pt 05

Taking the cloth off and having it inside out, cut the excess:


When done, will look like this:


Put it back and sew the side. After this is done, you need to fill the box. I had some crumpled paper at the bottom, some thorn paper at the middle and more acrylic blanket on the top.


Don't fill it too much at this point. It's just enough to have a "filling" in place. Let's see the top. Next...

Tutorial: Round Pincushion - pt 04

When I have to work with something that needs more than one thread to sew, I usually try to make the "joint" in the middle of the two cloth pieces I'm sewing. This makes me sure it will not be shown outside or inside. That's how I made it:


Having a piece back in the middle will make sure it will not be loose, and the end of the thread will be safe inside, in the middle of the work.


Just pull it and cut carefully. If you pulled enough, the extreme of the thread will go inside and not be shown.


To continue sewing, I fix the new thread near the last "point" of the previous thread, the same way I did with the first one.


And go back the thread to the top of the last "point" I made to continue.


To finish, after the last point, you need to just fix it with the first point you made... not sure on how to explain, let's see the pic:


This done, make a knot and pull the needle back inside to hide the end.


Now the bottom is right at it's place. As I didn't want that 1cm inside to stay beveled, I took the cloth off and carefully cut the excess. Next...


Tutorial: Round Pincushion - pt 03

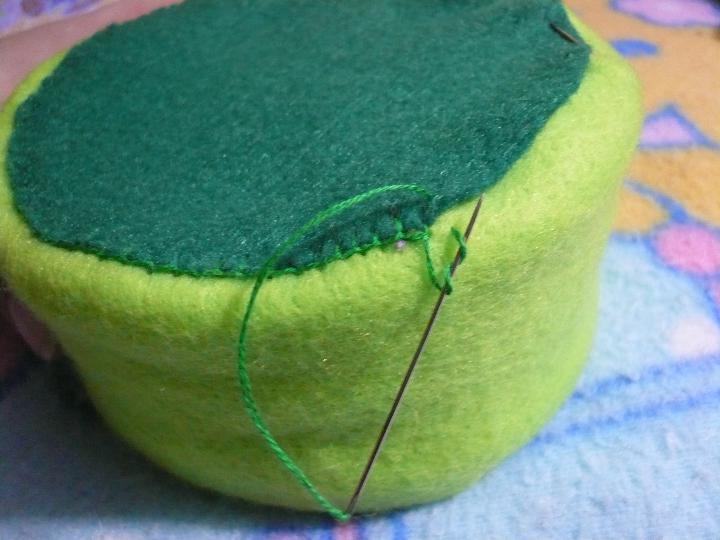
To sew the bottom with the side of the box I fixed all the borders with pins, letting the bottom *dark green* over the side border *light green*.


The light green is like 1cm inside/below the dark green circle.

To start sewing, using a single thread fold in half with a knot, as felt is really "fluffy" and the knot doesn't fix really well, what I made is having the needle back in the middle of the two treads under the knot.


With this made first, you can sew without having to worry, because the thread will be fixed.

To sew I made it this way *no idea on how to explain with words*


I'm sure that does have a name, but I really have no idea, sorry... LOL.

I don't like to work with a long thread, then I had to finish the first one and begin another. If you have this "problem" I'll explain next how I made it in a way it will not show when it's done. Next...

Tutorial: Round Pincushion - pt 02

With the circle done, take measure of the lateral of the box, cut it a bit larger on both sides *up and down* and have an extra for the length, as if you're going to use some acrylic blanket to fill you'll not have trouble later.


I had the blanket with the size I needed and then had it stick with double sided tape to the box side.


With a bit more of tape, fix the circle at the bottom of the box, just to make stay in it's place while you sew, you'll see later why I didn't use glue.


Next put the side piece over the blanket and fix with a pin.


This made you can just sew the border, just having both parts together and thing like that... LOL. But I made it in a more "elaborated" way, you'll see next...

Tutorial: Round pincushion - pt. 01

It's been a while I'm with the pics here to post, but my legendary lazyness will always win and the pics will remain here... LOL

Well, then I decided to finally make the post today... not sure if it's really something useful, but I try to... XD

First, I made a round box, using the Papier Colle technique. Set it dry completely and then measured the diameter. This made, there's the need to cut it in whatever you'll use to cover. I"m making it with felt, as it doesn't need to have a lot of knowledge or ability to work with.

The big problem working with felt or some other kinds of cloth is to transfer the circle to it and cut. You can print, but make the print size match your box can be tricky. Then you can use a compass, but, working with felt a compass isn't the best thing to do... LOL

I'll show you a little trick I always use to make circles. It's fail proof, you don't need a compass or tons of math to calculate anything... *obviously, because Eri-fail is the worst in maths*.

With the diameter you need, cut a stripe of paper. Or plastic, cardboard, carton, anything you have at hand.


This simple. With something soft as a base, like cardboard, high density foam, or polystyrene foam, fold the paper stripe in half and fix it with a pin.


Then all you need to do is pick a chalk, pen, pencil or what you have at hand, and trace the circle, using both extremes of the stripe.


Tracing both at the same time, you'll make half circle with one ending and half with another. This allow to make ANY size of circle, you just need to know the diameter you need.


Easy-peasy. Cut it and *drumroll* there's your circle... LOL